Cityscape Pro for 3ds Max documentation

Getting Started


If you are new to Cityscape Pro, You have came to the right place to start. This simple guide will walk you through every feature of the plugin.

For video tutorials, please visit  TUTORIALS  page.


Cityscape Pro Features Reel

Installation


Overview

Setting up Cityscape Pro for 3ds Max comprises of two steps: installing and licensing through your OS.

The Cityscape Pro installer for 3ds Max is simple and easy to follow and can be downloaded from https://www.simpolium.com website. Before installing Cityscape Pro, please make sure your computer meets the System Requirements for running 3ds Max with Cityscape Pro.

Licensing Cityscape Pro

During the installation, you will have to enter your name, name of the company, and serial number that was provided to you after purchase. There are two types of licenses for Cityscape Pro – Workstation and Render node. You must have an internet connection to activate a license. Workstation license can be activated only once. If you want to transfer a license to a different workstation, please contact the support to deactivate the license and transfer it to another workstation. Render node licenses are unlimited and free, as long as you have at least one valid workstation license.

Trial versions are fully licensed for a period of 30 days and are designed solely for Evaluation purposes. A trial is not to be used for profit, production, or commercial use.

Access Cityscape Pro

After the installation:

  • Cityscape Pro will appear in Create panel > Helpers > Simpolium > Cityscape Pro.
  • Supergrass will appear in Create panel > Geometry > Vray > Supergrass
  • Cityscape splines will appear in Create panel > Shapes > Cityscape

The main installation directory at C:/Program Files/Simpolium/Cityscape  is defined as <cityscapedir>

List of items inside of <cityscapedir>/Library:

  • *.mat files – Material library presets
  • Textures folder – contains textures
  • Thumbnails folder – contains thumbnails for material, texture library
  • Supergrass – contains thumbnails for supergrass presets

Location of the Cityscape Pro plugin: <maxdir>\plugins\cityscapePro.gup

Unattended installation

  • /?, /HELP – See available parameters
  • /SILENT, /VERYSILENT – enable silent installation
  • /LOG – Causes Setup to create a log file in the user’s TEMP directory detailing file installation and [Run] actions taken during the installation process
  • /LOG=”filename” – Same as /LOG, with a custom file location. If a file with the specified name already exists it will be overwritten. If the file cannot be created, Setup will abort with an error message.
  • /COMPONENTS – [workstation, render]
  • /LICENSEID – License ID to activate your installation.


Components:

workstation or render – mandatory component depending on the installation type, you should also choose additional components depending on available 3ds Max versions on your system:

  • workstation/2017, workstation/2018, workstation/2019, workstation/2020, workstation/2021
  • render/2017, render/2018, render/2019, render/2020, render/2021

Examples:

  • set h=%computername%
    CityscapePro-1.3.2.exe /VERYSILENT /COMPONENTS=render,render/2017,render/2018 /LICENSEID=yourLicenseId /LOG=Y:\CityscapePro\Install\logs\%h%-log.txt
  • set h=%computername%
    CityscapePro-1.3.2.exe /VERYSILENT /COMPONENTS=workstation,workstation/2020 /LOG /LICENSEID=yourLicenseId

Requirements


  • Cityscape Pro supports 3ds max 2017 –  2024.
  • Internet connection is required for licensing.

Supported Render Engines

Cityscape Pro supports native geometry tools on all render engines.

  • Supergrass is only supported on Vray 3.x and higher.
  • Material library presets are currently available only for Vray and Corona.
  • Distance and Autodust template in Road Texture tool is only supported in Vray and Corona.

Direct Link: https://www.simpolium.com/documentation/?tab=requirements

Main Toolbar


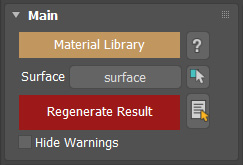
The Main toolbar is used to generate result and access material library. The interactive generate button turns blue and flashes when changes are detected.

Note: After the installation, Cityscape Pro helper will appear in Create panel > Helpers > Simpolium > Cityscape Pro.

1
Contains over 70 high quality Vray and Corona material presets
2
Surface geometry is used as a base for all calculations. Once the Curbed Areas are generated on top, it turns into road
3
An interactive button which generates a result. The button turns blue and flashes when changes are detected
4
Support contact Information
5
Select surface object
6
Select all input splines
7
If checked, warning messages will be hidden, but when a problem is detected, the generate button will still turn red

Overview

  1. Material Library – Contains over 70 high quality Vray and Corona material presets. The materials can be applied to Cityscape elements as well as any other object in a scene. (See the Material Library section).
  2. Surface – Surface geometry is used as a base for all calculations. Once the Curbed Areas are generated on top of it, the exposed part of surface turns into road.

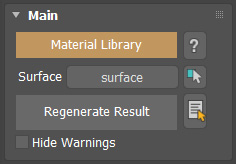
    To start, click the <Pick Surface> button and pick the surface geometry in the scene.

    Note: For best results, the base surface should be a clean, uniform geometry without double faces, holes, flipped polygons or long triangles. Quad polygons are recommended. For optimal calculation times, the surface area and polycount  should be low. (See the Knowledge Base section)

  3. Generate – An interactive button which generates a result. The button turns blue and flashes when changes are detected. The button turns red when problems are detected with input elements.
  4. ? – Support contact Information.
  5. Select all splines – Select all input splines.
  6. Hide warnings  – If checked, warning messages will be hidden, but when a problem is detected, the generate button will still turn red.
Notes:
  • All input splines must be closed and should NOT be self-intersecting. It is recommended to name input splines to make the workflow more intuitive. (See the Knowledge Base section)

Direct Link: https://www.simpolium.com/documentation/?tab=main-toolbar

Curbed Areas


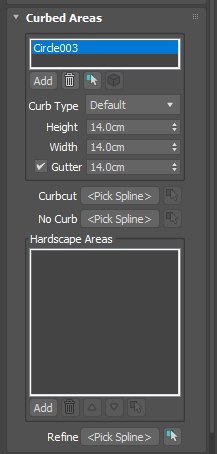
Curbed areas are elevated areas (0.01m to 0.2m) from a road surface which is surrounded by curbs. The remaining exposed part of the surface object that is not covered with curbed areas, acts as a road model.

Notes:

  • Use the “Generate” button in Cityscape Pro helper > Main toolbar to generate result.
  • After the installation, Cityscape Pro helper will appear in Create panel > Helpers > Simpolium > Cityscape Pro.
  • All input splines must be closed and should NOT be self-intersecting. It is recommended to name input splines to make the workflow more intuitive. To read more (See the Knowledge Base section).
1
List of curbed areas defined by splines. Height and curb type can be controlled with dropdown menus
2
Select curbed area geometry
3
Spline area, which defines where to create curbcuts. To create curbcuts, click the button and select a closed spline from the scene. The spline area should be wide enough to cover the curbcut slope ~ 1.2 meters
4
Spline area which removes curb. To create no curb areas, click the button and select a closed spline from the scene
5
List of hardscape areas, which have unique material lD. Areas are defined by closed splines. To start, click “Add” button and pick a closed spline from a scene, the item will appear in the list. Up to 11 hardscape areas can be added. The list numbers are corresponding to Material ID-s. The list acts like layers, item with higher number will cover other areas with lower number.
6
Selects input spline
7
Refines local area to improve calculation precision and fix problematic areas. Procedure: Draw a small rectangle that covers the problematic area, pick it as a refine spline and generate. The Refine tool will subdivide the specified area and calculation resolution will increase to generate a correct mesh
8
Curb type dropdown menu.
9
Curb height value.
10
Curb width value
11
Curb gutter checkbox with width value.

Overview

  1. Curbed Areas – List of curbed areas defined by splines. Height and curb type can be controlled with dropdown menus.
  2. Select curbed area – Select curbed area geometry.
  3. Curbcut – Spline area, which defines where to create curbcuts. To create curbcuts, click the <Pick Spline> button and select a closed spline from the scene. The spline area should be wide enough to cover the curbcut slope ~ 1.2 meters.
  4. No Curb – Spline area which removes curb. To create no curb areas, click the <Pick Spline> button and select a closed spline from the scene.
  5. Hardscape Areas  – List of hardscape areas, which have unique material lD. Areas are defined by closed splines. To start, click “Add” button and pick a closed spline from a scene, the item will appear in the list. Up to 11 hardscape areas can be added. The list numbers are corresponding to Material ID-s. The list acts like layers, item with higher number will cover other areas with lower number. Note: Click to remove list item, to move list items up and down,  To select input spline, to select curbed area geometry. It is recommended to name splines correctly, to make the workflow intuitive.
  6. Select  – Selects input spline.
  7. Refine  – Refines local area to improve calculation precision and fix problematic areas. Procedure: Draw a small rectangle that covers the problematic area, pick it as a refine spline and generate. The Refine tool will subdivide the specified area and calculation resolution will increase to generate a correct mesh.
  8. Curb type dropdown menu.
  9. Curb height value.
  10. Curb width value.
  11. Curb gutter checkbox with width value.

Cityscape Mapping modifier


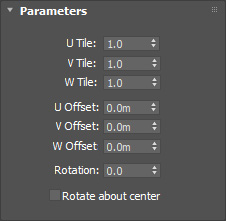
Cityscape mapping modifier is used on hardscape area and curbed area splines to modify tiling, offset and rotation of map channel 1.

Notes: 

  • Use the “Generate” button in Cityscape Pro helper > Main toolbar to generate result.
  • The Cityscape Mapping maodifier gets automatically applied to a spline once it is picked in hardscape area or Curbed area lists.
  • The result is not realtime, it gets calculated during the generation process.
1
Control U V W tiling on hardscape areas
2
Control U V W offset on hardscape areas
3
adjust mapping rotation

    Overview

  1. UVW tiling – Control U V W tiling on hardscape areas.
  2. UVW offset – Control U V W offset on hardscape areas.
  3. Rotation – Adjust mapping rotation.

Supergrass


The toolbar allows user to automatically create Supergrass object on selected hardscape area with few clicks.

1
Existing hardscape area list
2
Creates supergrass on a selected hardscape area. When unchecked, Supergrass object will be deleted.
3
Load Supergrass templates
4
Select supergrass object
5
Control grass density on distant areas

Overview:

  1. List – Existing hardscape area list
  2. Enabled Checkbox – Creates supergrass on a selected hardscape area. When unchecked, Supergrass object will be deleted.
  3. Supergrass Library – Load Supergrass templates. Once loaded, short name of the loaded template will be displayed in the list.
  4. Select – Select supergrass object.
  5. Level of detail – Control grass density on distant areas. To lower the density of the grass on large areas, use the dropdown menu, use low or Medium detail on distant aerial views to speed up render time.

Supergrass object


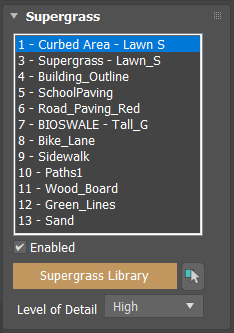
Supergrass is a procedural grass plugin for vray. The grass is generated only during render time and is not actually present in the scene.

To create a Supergrass object, you must first select a mesh with real-world mapping from the 3ds Max scene, then go to the Create panel, choose the VRay category, and then click on the Supergrass button. Note that if you have not selected an object, or you have selected an object which is not compatible with Supergrass, the Supergrass button will appear greyed out.
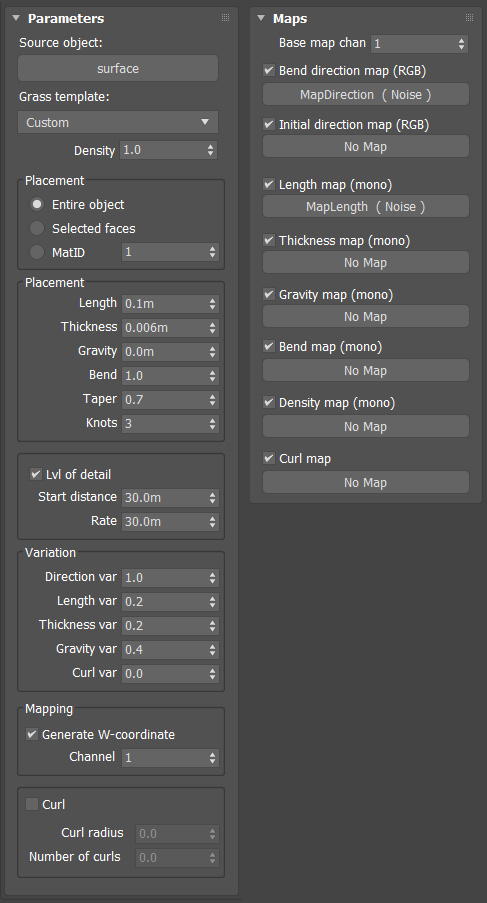
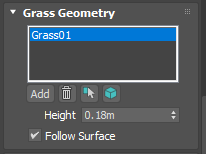
1
Specifies the source geometry with real-world mapping for the grass. You can click on this button only from the Modify panel.
2
Grass Template – Load a grass template from the list.
3
Specifies the number of strands per squared scene unit.
4
Determines which faces of the source object will generate grass strands. Entire object – All faces will generate fur.  Selected faces – Only selected faces will generate Grass.
5
Length – Specifies the length of the grass strands. Thickness – Specifies the thickness of the strands. Gravity – Controls the force that pulls grass strands down along the Z-direction. Bend – Controls the elasticity of the grass strands. Taper – Allows the user to add a taper to the individual strands of grass. Knots – This parameter controls the number of segments.
6
Level of detail. When enabled, V-Ray will generate less grass geometry for parts of the scene which are far away from the camera. This is done by decreasing the density of the grass strands and increasing their thickness.
7
Direction variation – Adds slight variation to the direction in which fur strands grow from the source object. Length/Thickness/Gravity/Curl var – Adds variation to the corresponding parameter.
8
Generate W-coordinate – In general, all mapping coordinates are taken from the base object. However, the W mapping coordinate can be modified to represent the offset along the grass strands. When this option is enabled, the W coordinate is the offset along the hair strands. The U and V coordinates are still taken from the base object. Channel – When Generate W-coordinate is enabled, this parameter specifies the channel for which the W coordinate will be modified.
9
Curl – When enabled, adds curls to the grass. Curl Radius – The radius of the individual curl. Curl Angle – The number of curls on a strand.
10
This parameter specifies which mapping channel is used.
11
This is an RGB map which specifies a bend direction of the grass strands in texture space. This is the direction in which the Grass strands curve to. The red component is offset along the u texture direction, the green component is the offset along the v texture direction, and the blue component is the offset along the surface normal.
12
This is an RGB map which specifies the initial direction of the grass strands, in texture space. The red component is offset along the u texture direction, the green component is the offset along the v texture direction, and the blue component is the offset along the surface normal.
13
Length/Thickness/Gravity/Bend map – These maps are multipliers for the corresponding parameters where black is a multiplier of 0.0, and white is a multiplier of 1.0.
14
Density map – This map is a multiplier for the strand density. Black portions of the map correspond to zero density, and white represents the normal strand density, as specified by the Distribution parameters.
15
Curl map – This map is a multiplier for the strand Curl. Black portions of the map correspond to no curl, and white represents the set curl, as specified by the Distribution parameters.

Overview:

  1. Source object – Specifies the source geometry with a real-world mapping for the grass. You can click on this button only from the Modify panel (and not from the Create panel).
  2. Grass Template – Load a grass template from the list.
  3. Density – Specifies the number of strands per squared scene unit. For example, if the the system units are in meters, this parameter specifies the desired number of strands per square meter, if the system units are centimeters, it specifies the number of strands per square centimeter and so on.
  4. Placement – Determines which faces of the source object will generate grass strands. Entire object – All faces will generate fur.  Selected faces – Only selected faces will generate Grass.
  5. Parameters: Length – Specifies the length of the grass strands. Thickness – Specifies the thickness of the strands. Gravity – Controls the force that pulls fur strands down along the Z-direction. Bend – Controls the elasticity of the grass strands. When set to 0.0, the strands are hard and all straight lines. Greater values cause the strands to bend (e.g. under the influence of gravity). Taper – Allows the user to add a taper to the individual strands of grass. Increasing this value will make the each strand thinner in its upper end and wider in its base. Knots – Grass strands are rendered as several connected straight segments; this parameter controls the number of segments.
  6. Lvl of detail – Level of detail. When enabled, V-Ray will generate less grass geometry for parts of the scene which are far away from the camera. This is done by decreasing the density of the grass strands and increasing their thickness. This parameter helps for two things: First, it conserves memory by decreasing the detail where it is too far to be visible. Second, it helps reduce animation flickering of very fine grass strands when they are far from the camera.
  7. Variation: Direction variation – Adds slight variation to the direction in which fur strands grow from the source object. Any positive value is valid. This parameter should be adjusted according to the scale of the scene. Length/Thickness/Gravity/Curl var – Adds variation to the corresponding parameter. Values range from 0.0 (no variation) to 1.0.
  8. Generate W-coordinate – In general, all mapping coordinates are taken from the base object. However, the W mapping coordinate can be modified to represent the offset along the grass strands. When this option is enabled, the W coordinate is the offset along the hair strands (0.0 is the strand base, and 1.0 is the tip). The U and V coordinates are still taken from the base object. Channel – When Generate W-coordinate is enabled, this parameter specifies the channel for which the W coordinate will be modified.
  9. Curl – When enabled, adds curls to the grass. Curl Radius – The radius of the individual curl. Curl Angle – The number of curls on a strand.
  10. Base map chan – Some of the texture maps represent vectors in texture space, where the x and y directions are derived from the u and v directions of a texture mapping channel. This parameter specifies which mapping channel is used.
  11. Bend direction map – This is an RGB map which specifies a bend direction of the grass strands in texture space (according to the specified Base map channel). This is the direction in which the grass strands curve to (the amount of curvature is also controlled by the Bend parameter). The red component is offset along the u texture direction, the green component is the offset along the v texture direction, and the blue component is the offset along the surface normal.
  12. Initial direction map – This is an RGB map which specifies the initial direction of the grass strands, in texture space (according to the specified Base map channel). The red component is offset along the u texture direction, the green component is the offset along the v texture direction, and the blue component is the offset along the surface normal.
  13. Length/Thickness/Gravity/Bend map – These maps are multipliers for the corresponding parameters where black is a multiplier of 0.0, and white is a multiplier of 1.0.
  14. Density map – This map is a multiplier for the strand density. Black portions of the map correspond to zero density (effectively no grass will be generated in these areas), and white represents the normal strand density, as specified by the Distribution parameters.
  15. Curl map – This map is a multiplier for the strand Curl. Black portions of the map correspond to no curl, and white represents the set curl, as specified by the Distribution parameters.

Knowledgebase


Surface Object

The surface object is used as a base for all calculations. The geometry should be single-sided, with normals facing upwards. The topology should be simple, clean, and uniform, a plane object would be an ideal, but complex terrain objects can be used as a surface as long the topology is clean and low poly. The surface should NOT contain double faces, flipped polygons, zero area triangles, or holes. It is recommended to use the Terrain tool under the Modify surface tab to add holes and other terrain assets.

Input Splines

The Input splines for Cityscape Pro should be simple, with a minimum required interpolation. Vertex count should be as low as possible to speed up calculations and avoid problems. It is highly recommended to clean up splines that are directly imported from CAD software. In some cases, it might make more sense to completely rebuild splines before using them in Cityscape Pro. The splines should NOT be self-intersecting, when self-intersection is detected, an error message will pop up with highlighted spline. All splines should be Closed, with an exception of Road Texture spline mask templates. When open spline is detected, an error message with highlighted vertices will pop up.

Fix hardscape areas that were not generated properly – Refine tool

Geometry defects on the generated mesh is a rare occasion, but there is a dedicated tool to fix that: Curbed Areas toolbar > Refine. Procedure: Draw a small rectangle that covers the problematic area, pick it as a refine spline, and generate. The Refine tool will subdivide the specified area and calculation resolution will increase to generate a correct mesh. The second option would be slightly shifting the problematic hardscape area spline vertices around in random directions. simplifying/reducing the vertex count of the problematic splines could also help.

Problematic spline area causes freezing during a generation

On rare occasions,  a problematic spline area can cause freezing during generation and/or wrong calculation results. There are a couple of ways of fixing that issue:

  1. Diagnose a scene, find which spline area is causing a problem. The right side of the progress bar shows the percentage and also displays a spline area name when a mesh is generated, if the scene freezes, the last displayed spline name could potentially be causing a problem.
  2. Apply the Cityscape Spline modifier on a problematic spline area and make sure “Alternative Calculation” Checkbox is enabled, then generate the Cityscape Pro again. The “Alternative Calculation” checkbox forces Cityscape Pro to use an alternative calculation algorithm that can fix a problem in many cases. Random Seed – The calculations are based on some level of randomness. Modifying the random seed number could improve a problematic calculation result. For more information, please go to “Cityscape Spline” link: https://www.simpolium.com/documentation/?tab=cityscape-spline
  3. Another option to fix an inaccurate calculation result can be redrawing and/or shifting a problematic spline area vertices around a bit.

Viewport settings for optimal performance

The Road Texture tool In Cityscape Pro can generate a very complex composite map. For optimal viewport performance, it is highly recommended to set the viewport rendering level to “basic” mode in 3ds max per-viewport performance window > Per View Presets > Rendering Level.

Distance from a scene center

It is recommended to place Cityscape assets close to 3ds max scene center to avoid problems caused by calculation accuracy. When the problem is detected, a warning message will appear.

Non-destructive workflow

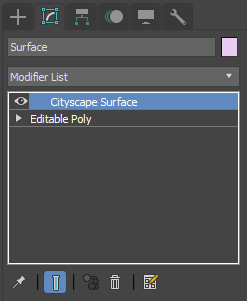
The result that gets generated by Cityscape Pro gets updated on each generation. It is not recommended to apply modifiers on top of Curbed Area geometry, otherwise, all custom edits on generated Curbed Area geometry will be lost on next generation. The same principle applies to a Surface object, when a Modify Surface checkbox is enabled, a Cityscape Surface modifier gets applied to the original surface object, which stores a new, modified mesh generated by Cityscape Pro. DO NOT collapse Cityscape Surface modifier, Do not place any modifiers on top of Cityscape Surface modifier. If you’d like to make any edits to the original surface object, edit the original object UNDER the Cityscape Surface modifier and regenerate Cityscape Pro.

Generation stages

Cityscape Pro has multiple dependant stages of generation to reduce the calculation time and only regenerate elements that need updates. If the changes are made to a lower level, like the Surface object, a full generation will be triggered, if the change is minor, a partial generation might occur, which can save calculation time. Cityscape Pro keeps multiple levels of buffered geometry to avoid full recalculation on minor changes.

Naming Cityscape Pro elements

Cityscape Pro is designed to generate large, detailed city-scale site models. It is very important to name all input splines properly to make a workflow intuitive. When the name of the Cityscape Pro helper is changed, a new name is displayed in a viewport. If you have multiple Cityscape Pro helpers in a scene, it can be useful to name them accordingly, for example: “Main Site”, “Context Site”, “Pavement Texture 01” and etc.

System Units Scale in 3ds Max

It is recommended to use inches in 3ds max System Units Scale –  Costumize>>Units Setup>>System Unit Setup>>System Unit Scale: 1 Unit = 1 Inches.

Direct Link: https://www.simpolium.com/documentation/?tab=knowledge-base

Material Library


The material library contains over 70 high quality tileable materials that can be used within Cityscape Pro environment as well outside of it. The materials are designed for real world mapping.

Note: To access material library, first create Cityscape Pro Helper from Create panel > Helpers > Simpolium > Cityscape Pro, then Click on orange Material Library button in the Main toolbar.

1
Specify a directory for a custom library
2
Quickly Isolate Dry, Wet or Winter material preset categories
3
Filter Material presets by selected list element category
4
Control thumbnail size
5
Copy selected material preset or apply it to objects by dragging and dropping
6
Randomly load  material presets to all Cityscape Pro elements
7
List of all Cityscape Pro elements
8
Select input spline for a list item
9
Applies selected material preset to a highlighted list item

Overview

  1. Choose Custom Library – Specify a directory for a custom library (Should contain the same folder structure as the original library directory). The individual *.mat files will be loaded as material presets. For thumbnails, create additional “Thumbnails” folder in the directory and place images with corresponding material names in .jpeg format, recommended resolution: 600X600 pixels. New material presets should be saved from a scene that uses  inches in 3ds max System Units Scale –  Costumize>>Units Setup>>System Unit Setup>>System Unit Scale: 1 Unit = 1 Inches.
  2. Filter – Isolate Dry, Wet or Winter material preset categories.
  3. Filter By Category – Filter Material presets by selected list element category.
  4. Thumbnail Size – Control thumbnail size.
  5. Material Button – Copy selected material preset or apply it to objects by dragging and dropping.
  6. Randomly Load To all Elements – Randomly load  material presets to Cityscape Pro elements.
  7. List – List of all Cityscape Pro elements with a material.
  8. Select  – Highlight an input spline in a scene.
  9. Load Selected Material – Applies selected material preset to a highlighted list item. Double clicking on material thumbnail is an alternative way to load a material.

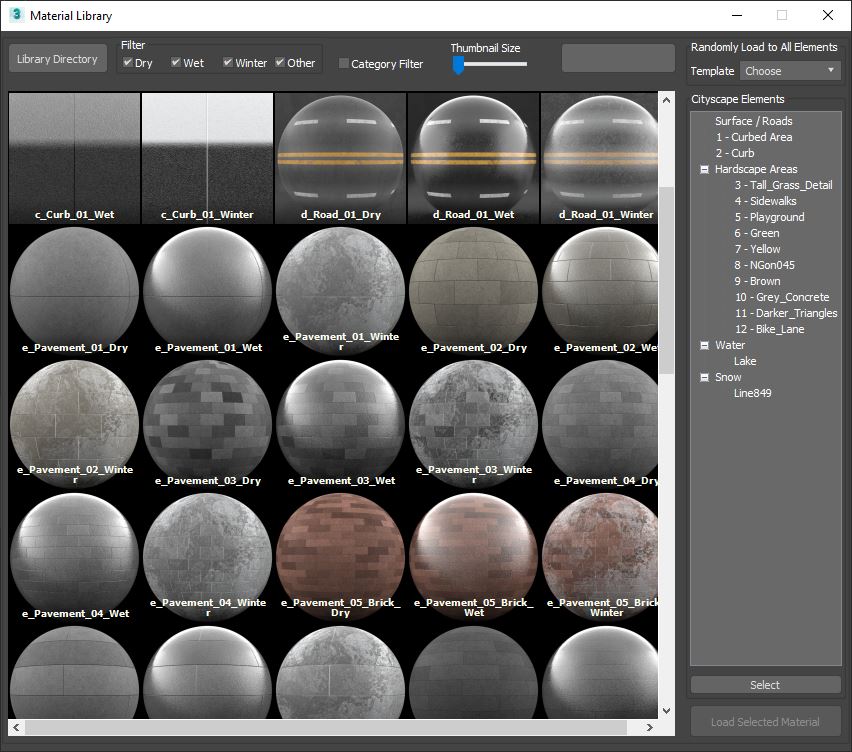
Direct Link: https://www.simpolium.com/documentation/?tab=material-library

Modify Surface


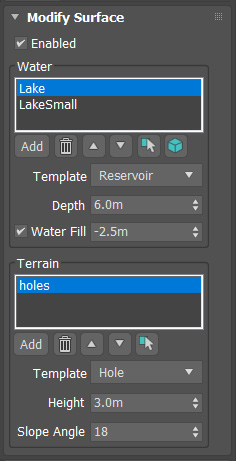
The toolbar is used to edit existing surface, add water areas – Lakes, ponds and reservoir as well as terrain areas – Berms, holes (in a surface) and terrain depression. When the checkbox is enabled, a Cityscape Surface modifier gets applied to the original surface object. The modifier stores a newly generated surface model, but also lets you edit the original surface object under the Cityscape Surface modifier.

Notes:

  • Use the “Generate” button in Cityscape Pro helper > Main toolbar to generate result.
  • To use this feature, the Surface geometry should be picked in Main toolbar.
  • DO NOT collapse Cityscape Surface modifier, that can cause issues.
1
The checkbox enables or disables modify surface feature
2
List of water areas. To start adding water areas, click “Add” button and pick a closed spline from a scene, then use the Generate button from the main toolbar
3
Lake, Reservoir and Pond templates. The spline for lake and pond should be simple and smooth sharp corners must be avoided
4
Specifies depth of a water area
5
The checkbox enables a water geometry generation
6
List of terrain areas. To start adding terrain areas, click “Add” button and pick a closed spline from a scene, then use the Generate button from the main toolbar.
7
Specifies height of a berm / Depth of a terrain depression
8
Berm, surface hole and Terrain Depression templates
9
Specify slope angle of a berm / terrain depression

Overview

  1. Enabled – The checkbox enables or disables modify surface feature.
  2. Water – List of water areas. To start adding water areas, click “Add” button and pick a closed spline from a scene, then use the Generate button from the main toolbar. Up to 3 water areas can be added. Note: Click to remove list item, to move list items up and down,  To select input spline, to select water geometry.
  3. Template – Lake, Reservoir and Pond templates. The spline for lake and pond should be simple and smooth sharp corners must be avoided. Note: To build a complex water area  with different types of banks, start with Reservoir template and build banks manually.
  4. Depth – Specify depth of a water area.
  5. Water Fill – The checkbox enables a water geometry generation.
  6. Terrain – List of terrain areas. To start adding terrain areas, click “Add” button and pick a closed spline from a scene, then use the Generate button from the main toolbar. Up to 3 terrain areas can be added.
  7. Template – Berm, hole and Terrain Depression templates.
  8. Height – Specify height of a berm / Depth of a terrain depression.
  9. Slope angle  – Specify slope angle of a berm / terrain depression.

Note: All input splines must be closed and should NOT be self-intersecting. It is recommended to name input splines to make the workflow more intuitive. (See the Knowledge Base section)


Direct Link: https://www.simpolium.com/documentation/?tab=modify-surface

Cityscape Surface modifier


Cityscape Surface modifier gets applied to the original surface object. The modifier stores a new, generated surface model, but also lets you edit the original surface object under the Cityscape Surface modifier.

1
Stores a new modified surface model and mapping information
2
Original Mesh – To make changes, edit the original mesh and then regenerate the Cityscape Pro. Don’t collapse the Cityscape Surface modifier!

Overview:

  1. Cityscape Surface Modifier – Stores a new modified surface model and mapping information.
  2. Original Mesh – To make changes, edit the original mesh and then regenerate the Cityscape Pro. Don’t collapse the Cityscape Surface modifier.


Direct Link: https://www.simpolium.com/documentation/?tab=cityscape-surface

Cityscape Spline modifier


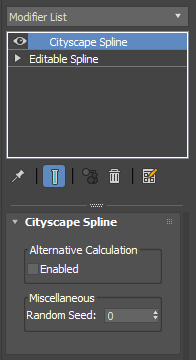
Cityscape Spline modifier can be applied to a problematic spline area that is used in Cityscape Pro. The modifier can force Cityscape Pro to perform an alternative calculation process for the spline area which can solve problems related to freezing during calculations or improperly generated mesh.

1
The modifier forces Cityscape Pro to perform an alternative calculation on a problematic spline area to attempt fixing an issue.
2
Enable or disable an alternative calculation algorithm.
3
The calculations are based on some level of randomness. Modifying the random seed number could improve a problematic calculation result.

Overview:

  1. Cityscape Spline Modifier – Forces Cityscape Pro to perform an alternative calculation on a problematic spline area to attempt fixing an issue.
  2. Enable Alternative Calculation – Enable or disable an alternative calculation algorithm.
  3. Random Seed – The calculations are based on some level of randomness. Modifying the random seed number could improve a problematic calculation result.

Direct Link: https://www.simpolium.com/documentation/?tab=cityscape-spline

Road Texture


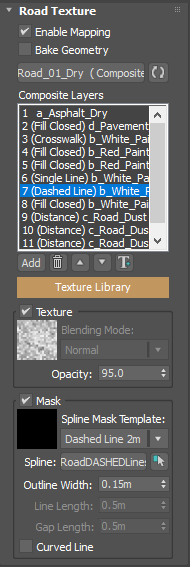
The road texture tool is used to create a procedural pavement texture or a complete road material for surface object (The remaining exposed part of the surface object that is not covered with curbed areas acts as a road model). The road texture tool uses 3ds max composite map and automatically configures it with spline masks.

Notes:

  • Use the “Generate” button in Cityscape Pro helper > Main toolbar to generate result.
  • To use this feature, surface geometry should be picked in the main toolbar.
  • When Road Texture is enabled, Surface object and Curbed area will automatically receive a new mapping information in uvw channel 2.

1
The checkbox enables uvw mapping on map channel 2 on the surface object (roads)
2
3ds max composite map, Road Texture tool configures it and automates spline mask creation
3
List refresh button
4
List of Composite Map layers. Click the “Add” button to add a new layer. When you click the “Add” layer button, a texture library window appears. To load a preset, double click on a thumbnail
5
Contains Texture presets for creating roads and pavements. To load a texture preset, first select a composite layer from the list, then click the texture library and load a desired texture to the layer
6
Enables or disables a texture for the selected layer
7
Texture Blending mode. (Normal blending mode is recommended for most cases)
8
Texture Opacity value 0-100
9
The checkbox enables or disables a mask
10
To apply a spline mask to the layer, choose a template and pick spline. Custom Map – Use when custom mask (or no mask) is needed. Calculations won’t affect the custom map. Single Line – A single continuous line for pavement markings, parking lines or pavement patterns. Dashed Line –  3m(with 6m gap)    2m(with 2m gap) Dashed Custom – Custom dashed line with custom line length and gap length. Curved line checkbox creates additional segments for sharp turns. Crosswalk – Typical crosswalk with 0.6 length and  0.6m Gap, Default width – 3m. Distance – useful for creating dust lines, dirt, snow and etc. Use the width rollout to control spread.  Autodust – automatically creates dust masks from existing pavement markings in a list. It also uses existing curbed area splines for creating a dust mask
11
Input spline for creating spline masks
12
Select the picked spline
13
Controls a width of a line. default – 0.1m
14
The parameter becomes active once “Dashed Custom” spline mask template. It defines a length of a line
15
The parameter becomes active once “Dashed Custom” spline mask template. It defines a length of a gap
16
Curved Line – The parameter becomes active once “Dashed Custom” spline mask template. When enabled, the dashed lines get additional segments to follow curved lines on sharp corners

Overview

  1. Enabled – The checkbox enables uvw mapping on map channel 2 on the surface object (roads).
  2. Composite Map – 3ds max composite map, Road Texture tool configures it and automates spline mask creation.
  3. Refresh – List refresh button.
  4. List – List of Composite Map layers. Click the “Add”  button to add a new layer, to remove layer, to move layers up and down,  to rename a layer. When you click the “Add” layer button, a texture library window appears. To load a preset, double click on a thumbnail.
  5. Texture Library – Contains Texture presets for creating roads and pavements. To load a texture preset, first select a composite layer from the list, then click the texture library and load a desired texture to the layer.
  6. Texture checkbox – Enables or disables a texture for the selected layer.
  7. Blending Mode – Texture Blending mode. (Normal blending mode is recommended for most cases)
  8. Opacity – Texture Opacity value 0-100.
  9. Mask checkbox – The checkbox enables or disables a mask.
  10. Spline Mask Templates – To apply a spline mask to the layer, choose a template and pick spline. Custom Map – Use when custom mask (or no mask) is needed. Calculations won’t affect the custom map. Single Line – A single continuous line for pavement markings, parking lines or pavement patterns. Dashed Line –  3m(with 6m gap)    2m(with 2m gap) Dashed Custom – Custom dashed line with custom line length and gap length. Curved line checkbox creates additional segments for sharp turns. Crosswalk – Typical crosswalk with 0.6 length and  0.6m Gap, Default width – 3m. Distance – useful for creating dust lines, dirt, snow and etc. Use the width rollout to control the0 spread (Works only with Vray and Corona).  Autodust – automatically creates dust masks from existing pavement markings in a list. It also uses existing curbed area splines for creating a dust mask. (Only Works with Vray and Corona).
  11. Spline – Input spline for creating spline masks.
  12. Select – Select the picked spline.
  13. Outline Width – Controls a width of a line. default – 0.1m.
  14. Line Length – The parameter becomes active on “Dashed Custom” spline mask template. It defines a length of a line.
  15. Gap Length – The parameter becomes active on “Dashed Custom” spline mask template. It defines a length of a gap.
  16. Curved Line – The parameter becomes active on “Dashed Custom” spline mask template. When enabled, the dashed lines get additional segments to follow curved lines on sharp corners.

Direct Link: https://www.simpolium.com/documentation/?tab=road-texture

Snow Geometry


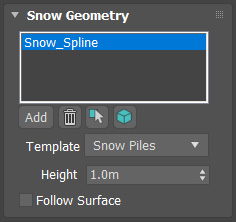
Snow Geometry tool allows user to easily create snow piles and compacted snow geometry for winter scenes.

Notes:

  • Use the “Generate” button in Cityscape Pro helper > Main toolbar to generate result.
  • To use this feature, the Surface geometry should be picked in the Main toolbar.
  • All input splines must be closed and should NOT be self-intersecting. It is recommended to name input splines to make the workflow more intuitive (See the Knowledge Base section).
1
List of snow areas defined by splines. Up to 4 snow areas can be added. It is recommended to keep the snow ares relatively small, bigger areas will have less detail because of fixed polycount
2
Choose between snow piles and compacted snow templates
3
Defines height of a snow area
4
When checked, a snow geometry will follow the main surface object terrain

Overview

  1. Snow Geometry – List of snow areas defined by splines. Up to 4 snow areas can be added. It is recommended to keep the snow ares relatively small, bigger areas will have less detail because of fixed polycount. Note: Click to remove list item, to move list items up and down,  To select input spline, to select snow geometry.
  2. Template – Choose between snow piles and compacted snow templates.
  3. Height – Defines height of a snow area.
  4. Follow Surface – When checked, a snow geometry will follow the main surface object, if unchecked, it will follow the snow spline.

Direct Link: https://www.simpolium.com/documentation/?tab=snow-geometry

Cityscape Map


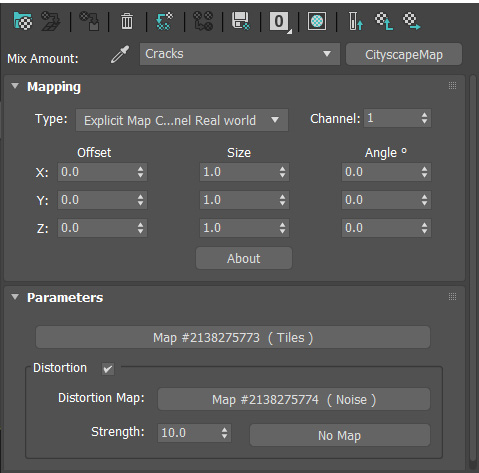
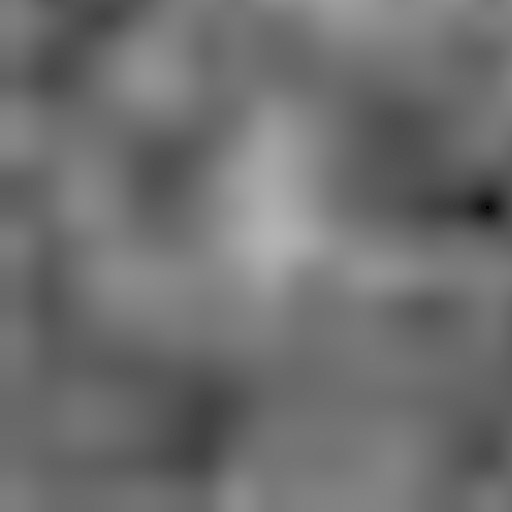
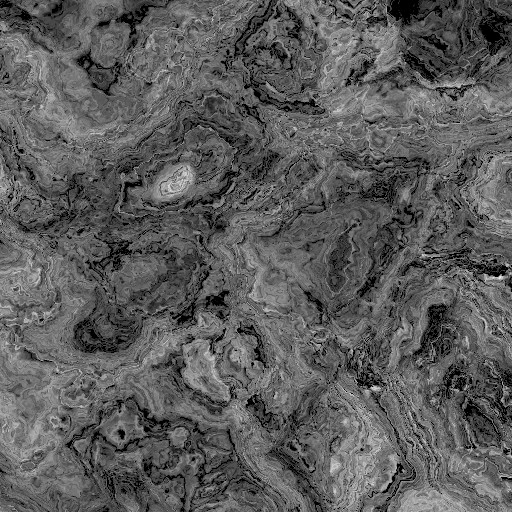
Cityscape Map can be used in multiple case scenarios, It can control mapping coordinates on multiple levels (for example to fully rotate a complex composite map with only one parameter). Cityscape map also has a distort feature which allows user to distort one bitmap with another one, to create complex noise maps and avoid tiling effect. (Very useful for terrain textures and dirt maps)

1
Mapping type of the base texture (4).
2
Map channel of the base texture (4).
3
Offset, Size and Angle parameters of the base texture (4).
4
Base Texture.
5
When Checked, Distortion Map (6) gets activated.
6
A grayscale map that distorts the base texture (4).
7
Strength value of the Distortion Map (6).
8
Strength map of the Distortion Map (6).

Overview:

  1. Mapping type of the base texture (4).
  2. Map channel of the base texture (4).
  3. Offset, Size and Angle parameters of the base texture (4).
  4. Base Texture.
  5. Distortion Checkbox – When Checked, Distortion Map (6) gets activated.
  6. Distortion Map – A grayscale map that distorts the base texture (4).
  7. Strength value of the Distortion Map (6).
  8. Strength Map of the Distortion Map (6).

Distortion example:

A low resolution base texture, Distortion – OFF|ON

Splines Presets


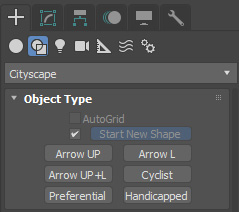
Cityscape Splines Presets can be used for road markings in Road Texture tool. Arrows, Cyclist, Preferential and Handicapped shapes are located in Create panel, Shapes tab, under Cityscape category.  All Cityscape shapes are closed, it is recommended to scatter them around a scene as per site plan, attach all of them together to a single spline and use it in the Road texture tool with “Fill Closed Spline” template.

1
The splines are located under Create panel, Shapes tab, under Cityscape category
2
Can be used in Road Texture tool, with “Fill closed spline” mask template

Overview

  1. The splines are located under Create panel, Shapes tab, under Cityscape category.
  2. Cityscape Splines – Can be used in Road Texture tool, with “Fill closed spline” mask template.

Direct Link: https://www.simpolium.com/documentation/?tab=spline-presets

Warning Messages


Cityscape Pro comes with diagnostic tools to help user troubleshoot a scene. When a potential problem is detected, the generate button turns red and a warning message appears.

1
When a problem is detected, the generate button turns red
2
You can disable warning messages, but when the problem is detected, the button will still turn red

Overview

  1. Red generate button – When a problem is detected, the generate button turns red.
  2. Hide Warinings – You can disable warning messages, but when the problem is detected, the generate button will still turn red.

Warning messages:

  • “A Curbed Area object can NOT be picked as a Surface. Instead, pick the base surface object that was used to generate that curbed area.”
  • “The Curbed area object has a modifier, which will be lost after regeneration. It is recommended to avoid further modifications to a generated geometry to keep the workflow non-destructive.”
  • “The Curbed Area is too far away from the center, that can cause problems. Please move everything closer to zeroes.”
  • “The surface geometry is very heavy! The calculation might take a while. Please reduce the surface polycount.”
  • “The Surface has flipped polygons, which can cause problems. Please make sure the surface geometry is as simple and clean as possible.”
  • “The Surface object has holes, which can cause problems. It is recommended to start with a simple plane object and create holes afterwords in Modify Surface tab>Terrain.”
  • “The surface geometry has zero area faces / thin triangles which can cause problems, Please clean up the surface topology to get the best results.”
  • “The Spline is too heavy, calculations can take a while. Please reduce number of vertices and spline interpolation steps.”
  • “The Surface object has a modifier applied on top of Cityscape Surface modifier which might cause problems on next generation. Modifiers should be applied UNDER the Cityscape Surface modifier.”

Direct Link: https://www.simpolium.com/documentation/?tab=warning-messages

Collapse Cityscape


Starting from v1.5.0, Cityscape Pro comes with a utility that allows users to collapse Cityscape objects and maps to render the scene on machines that don’t have the plugin installed.

The “Collapse Cityscape objects” command is located under Main Menu>>Cityscape Pro dropdown menu. It is recommended to back up the scene before collapsing to maintain a parametric workflow.

Release Notes


Cityscape Pro v1.6.1

Improvements:
  • 3ds Max 2024 support added.
  • Increased range of height values in Curbed Areas >> Height.

Cityscape Pro v1.5.1

Improvements:
  • V-Ray 6 support added.
  • 3ds Max 2023 support added.
  • Collapse Cityscape objects  – A feature that allows users to remove Cityscape Pro assets from the scene while still maintaining the ability to render the scene on machines that don’t have the Cityscape Pro plugin installed.
  • Increased range of depth values in Modify Surface >> Terrain >> Depression template.

Fixes:

  • Road texture was duplicating some input splines on each generation – fixed.

Cityscape Pro v1.4.4

Fixes:

  • The curb calculation algorithm has been rewritten to improve speed and stability in new versions of 3ds Max.

Cityscape Pro v1.4.3

Improvements:
  • Calculation performance improvements

Fixes:

  • The curb geometry bug in 3ds Max 2022 is fixed.

Cityscape Pro v1.4.2

Improvements:
  • Minor Bug fixes

Cityscape Pro v1.4.1

Improvements:
  • New Curb Profiles
  • New Curb Width feature
  • Curb Gutter option.
  • 3ds Max 2022 support
Fixes:
  • Supergrass compatibility issue with Vray 5 has been fixed
  • Adaptive subdivision bug in 3ds Max 2021 is now fixed.

Cityscape Pro v1.3.5

Improvements:
  • Improved User Interface
  • Road texture tool – Autodust and Distance limit has been increased to 1000m
  • Improved diagnostic tools
Fixes:
  • Supergrass compatibility issue with Vray 3.7.x has been fixed

Cityscape Pro v1.3.4

Improvements:
  • V-Ray 5 support
  • Random Seed option in Cityscape Spline modifier for improving calculation result.
Fixes:
  • Supergrass compatibility issue with Vray 4.0.x has been fixed
  • Other minor bug fixes

Cityscape Pro v1.3.3

Fixes:
  • Zero curbed area height has been fixed
  • Minor Bug fixes

Cityscape Pro v1.3.2

Improvements:
  • 3ds Max 2021 support
  • Release Notes for a new version of Cityscape Pro is now visible in the update message window
Fixes:
  • Supergrass compatibility issue with Vray 4.2.x has been fixed
  • An internal error was sometimes occurring with the “double line” spline mask template in Road texture
  • Unattended installation bugs have been fixed
  • Different calculation result, when restoring buffered geometry – fixed

Cityscape Pro v1.3.1 Beta

Improvements:
  • Improved accuracy when displaying self-intersection points
  • Download link for a new version of Cityscape Pro is now visible in the update message window
Fixes:
  • Critical bugfix: The supergrass compatibility issue with Vray Next has been fixed. (It is strongly recommended to delete Supergrass objects in existing Vray Next scenes and recreate them by using Cityscape 1.3.1 version)
  • The surface high polycount warning message was not displayed correctly
  • Installation now won’t continue if 3ds Max 2017-2020 is not detected

Cityscape Pro v1.3.0 Beta

Improvements:
  • 3ds Max 2017-2020 support
  • Automatic unit scale conversion for material presets
  • Diagnostic information about a calculation process on the right side of the progress bar
  • A new Cityscape Spline modifier that forces Cityscape Pro to use an alternative calculation algorithm to improve a result
Fixes:
  • Internal error on Refine tool
  • Minor bug fixes

Cityscape Pro v1.2.5

Improvements:
  • A warning message when input splines have too many vertices
  • A warning message when a surface object has holes
  • A warning message when a surface object has zero area faces
  • A warning message when there is a modifier sitting on top of Cityscape Surface modifier
  • An error message when a curbed area geometry is used as a surface object
  • Licensing information and expiry date in the “About” tab
Fixes:
  • Internal error on crosswalk spline template

Cityscape Pro v1.2.4

Improvements:

  • New warning messages to troubleshoot problematic scenes.
  • RED color for interactive generate button that indicates a problem.
  • New “Hide Warnings” Checkbox.


Fixes:

  • The curbed area would disappear if snow geometry was generated.
  • Snow geometry had spikes in some scenes.
  • The curbed area up and down arrows did not work properly.
  • Spline would not get picked in Road Texture ‘fill closed shape’ mask.
  • Modify Surface lists were loading wrong default settings.
  • Minor UI fixes in Road Texture tool.

Cityscape Pro v1.2.1

Improvements:

  • Corona Renderer support!
  • A new actual Supergrass object which eliminates viewport problems and can also be used as a standalone tool outside of Cityscape Pro Environment.
  • A custom title can be assigned to the Cityscape Pro helper in the viewport to make the workflow more intuitive.
  • Automatic Material setup option in Road texture with Dry Wet and Winter materials.
  • AutoDust mask preset in Road texture, which automates road dust setup by reusing existing paint lines.
  • Curbed Area now has a range of height options, from 0.01m to 0.2m.
  • Up to 20% faster calculation on large scenes.
  • Improved Crosswalk preset in Road Texture tool.
  • Local Material library at C:\Program Files\Simpolium location – Improves material load time and eliminates slow network-related errors.
  • When clicking a grey Generate Button and no changes are detected, Cityscape Pro asks if the user wants to do a full regeneration.
  • Improved Geometry repair algorithm.
  • A new Refine tool, which increases a mesh density in specified areas to improve the accuracy of complex hardscape area calculations.

Fixes:

  • When a spline self-intersection was detected, Cityscape was selecting the wrong spline.
  • Curbed Area was sometimes generated at the wrong height.
  • Scenes with multiple Cityscape Pro helpers did not always detect spline updates.
  • The license had to be activated per individual user.
  • Modify surface tab had an interface update bug.

Cityscape Pro v1.1.2

Improvements:

  • Interactive Generate Button starts blinking when changes are detected on splines, surface or Cityscape Pro interface.
  • Self-intersection check on splines with highlighted vertices.
  • A new licensing system that allows greater flexibility when transferring licenses to other workstations.
  • New Curbcut with adaptive subdivision, larger areas can be created without slowdown.
  • New terrain Depression template in Modify Surface tab.
  • Slope angle control on Depression and berm templates.
  • New Custom dashed line where you can specify line and gap lengths.
  • New follow surface Checkbox in Snow Geometry for more flexibility.
  • Snow and Water geometry are now created with materials.
  • Ability to generate more than one road texture per 3ds max scene.
  • Optimized code resulting in faster calculations.
  • Interface improvements.
  • Update Notifications.

Fixes:

  • A full update would be triggered on autosaves, resulting in unnecessary full calculations.
  • Hardscape Area List items were not calculated properly when moved up or down.
  • Supergrass was not following the Hardscape Area list when moved up or down.
  • Smoothing group issues on water geometry.
  • Snow geometry was changing material and node on each generation.
  • Road material was losing instances in some cases.
  • New Supergrass template.
  • Delete button not working in the curbed area list.
  • Mapping issues on channel 2 when real-world map size is on by default in preferences.
  • Distance spline geometry was visible in the viewport when rendering.
  • Select button was not working properly in Material Library.

Cityscape Pro v1.0.1

Improvements:

  • An improved user interface, a new interactive generate button.
  • Terrain – Modify existing terrain or create new from scratch.
  • Water – Create realistic lakes, reservoirs by using spline areas.
  • New Material Library with a category filter, added presets.
  • Snow –  Create stunning winter scenes with full control.
  • Road Texture – Create parametric roads with pavement markings.
  • Supergrass – Hyper-realistic grass with one click.
  • Bug fixes and performance improvements.

Cityscape Pro v0.9.1 beta

Improvements:

  • The redesigned user interface, more hardscape areas.
  • Ability to swap splines between slots.
  • Geometry caching and partial calculations to improve performance.
  • Bug fixes.

Cityscape Pro v0.8.2 beta

Improvements:

  • Optimized code resulting in much faster calculation times.
  • Select all splines feature, which allows the user to quickly isolate all splines for editing.
  • New Curb Profiles:  None and Low Curb (same as Default, but only 10mm height).
  • Minor improvements in the user interface.
  • Improved polygon clipping algorithm producing more accurate results.
  • New Adaptive Subdivision – subdividing mesh as required to increase reliability with complex splines.
  • Curb Cut polycount has been reduced by 60% without sacrificing quality.
  • Self Intersection detection on splines.

Fixes:

  • Polygon triangulation and smoothing issues are fixed.
  • Mapping issues are fixed.
  • Cityscape Mapping modifier did not work with negative values – fixed.
  • New geometry clean-up algorithm – greatly reduces the chances of having distorted curbs.
  • Spline interpolation defaulting to 6 – fixed.
  • Generating double faces on large scenes – fixed.
  • Error on clearing a spline – fixed.
  • Hardscape areas not generating properly (even if the spline does not have self-intersection) – fixed.
  • Frozen calculation –  fixed.
  • Scenes with terrain were not generated properly – fixed.
  • Scenes using third party plugins that had auto-update enabled on the surface object was very slow to generate – fixed.

Cityscape Pro v0.8.1 beta

Improvements:

  • Added 2 extra hardscape area slots.
  • Optimized code resulting up to 30% faster calculation times.
  • Improvements in the user interface.

Fixes:

  • Imported splines from CAD software no longer cause freezing during a calculation.
  • Open splines are now detected even if the spline is already picked.
  • Spline areas that were accidentally converted to geometry won’t be calculated to prevent errors.
  • Dark spots no longer appear on a generated model.
  • If the surface object already has a material, default grey material won’t be applied during the first calculation.
  • Fixed render node support.

Cityscape Pro v0.8.0 alpha

Initial Release

Can’t find what you are looking for?

CONTACT US